ESPEED32 User Manual
User-focused guide for slot car racing: startup, key driving controls, menus, and backup/restore.
- Firmware source: ESPEED32 (
source/ESPEED32/). - Local manuals in repo: Quick Start + Extended Guide (DOC folder, DOCX/PDF).
- ACD reference: ACD PRO Manual 11E.
- CarSteen reference: CS 4.2 Owner's Guide.
The user documentation on espeed32.com always reflects the latest published version. The copy stored on the controller follows the firmware actually installed on that unit and is updated together with it.
1. Quick start
- Power the controller normally.
- Rotate encoder to move through menu items.
- Short press encoder: enter/exit value editing or open submenu.
- Short press brake button while editing: cancel (restore original value).
- Long press encoder (~1s): toggle LIST and race GRID view (when race view is not OFF).
2. Startup, calibration and self-test
- Recalibrate trigger after firmware update, or if trigger mechanics have changed.
Power ON: normal startup, then RUNNING mode.- For
TLE493Dbuilds, sensor variant/address is auto-detected on boot (no manual address edit needed). - Trigger sensor family is selected when firmware is compiled. Default releases/builds use
TLE493D; controllers built withAS5600,AS5600L,MT6701, orANALOGmust use a firmware build for that sensor family. - Hold
encoder buttonduring power on: trigger calibration. - Hold
brake buttonduring power on: Self-Test (9 steps).
Calibration flow
- Hold encoder while powering on until calibration screen appears.
- Fully press/release trigger several times.
- Press encoder once to store calibration.
- Verify throttle reads 0% at released trigger and 100% at full pull.
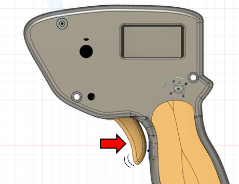
Trigger mechanics
- Trigger travel can be changed mechanically with the rear travel-stop screw.
- Trigger return feel depends on spring preload/return tension; adjust the spring anchor or tension slider carefully.
- After changing trigger travel or spring tension, or after opening the controller, recalibrate trigger before driving.
3. Display, race view, and ABOUT
This section groups what you see on the OLED: language, label style, race layout, status bar, and system info.
Language and display
DISPLAY -> LANGUAGEselects between localized labels and the ENG/CS/ACD naming profiles.NOR/ESP/DEU/ITA/NLD/POR: localized UI using the standardBRAKE/SENSI/ANTIS/CURVE/FADE/LIMITnaming set.ENG: generic naming (BRAKE/SENSI/ANTIS/CURVE/FADE/LIMIT).CS: CarSteen-style terms (ATTACK/CHOKE2/PROFIL/CHOKE1).ACD: ACD-style terms where directly applicable (SENSIandCHOKEfor limit).ANTISremains anti-spin because the ACD manual does not define a separate Choke2 term.DISPLAY -> CASEchooses whether labels are shown inUPPERorPascal.DISPLAY -> FONT SIZEchanges list/menu text density betweenLARGEandsmall.DISPLAY -> ADVANCEDtoggles whetherFADE,PWM_F, andBRAKE+are shown in the main menu. Turning itOFFhides those rows for a simpler menu, but the stored car values still stay active.DISPLAY -> STEPSopens the step settings submenu containing ANTISPIN, BRAKE STEP and SENSI STEP.DISPLAY -> STEPS -> ANTISPINopens the antispin display settings submenu where you select the display unit (MS/%/TEXT) and the encoder step size for each unit.DISPLAY -> STEPS -> BRAKE STEPsets how many percent the encoder moves BRAKE per tick (0.1–50.0%, default 1.0%). Configure inSETTINGS → DISPLAY → STEPS → BRAKE STEP.DISPLAY -> STEPS -> SENSI STEPsets the encoder step size for SENSI in 0.1% increments (0.1–5.0%, default 1.0%). Configure inSETTINGS → DISPLAY → STEPS → SENSI STEP.- The motor PWM output uses 10-bit duty resolution, so 0.1% BRAKE/SENSI steps are preserved through the controller math and hardware PWM conversion.
Race view behavior (LIST vs GRID)
- LIST classic menu with all main items.
- GRID race screen for fast edits while driving.
DISPLAY -> RACE MODE: OFF / FULL / SIMPLE.- FULL grid: BRAKE, SENSI, ANTIS, CURVE (+ CAR if
RACESWPis ON). - SIMPLE grid: BRAKE, SENSI (+ CAR if
RACESWPis ON). - Long encoder press toggles LIST/GRID.

Status bar and ABOUT
STATUS BAR: 4 fixed slots. Each slot can showOUT%,THRO,CAR,CURR,VOLT,VBAT,BRAKE, or blank.CURRshows mA below 1000 and A above.BRAKEin the status bar shows the active brake mode/value in real time:Bxxx%= normalBRAKE,Axxx%=Alt.Brake,Qxxx%=Rel.Brake QUICK,Dxxx%=Rel.Brake DRAG,NONE= no brake currently active. The code can change quickly while driving.VBATshows the optional internal battery voltage. On the standard board profile it usesGPIO15/ ADC2, so the reading may stop refreshing while WiFi is active.- While WiFi is active, the status bar shows
WIFI. It uses the first blank slot if available; otherwise slot 4 is temporarily overridden. ABOUTshows firmware/data version, detected trigger sensor, chip details, flash/heap, MAC addresses, and build date/time.
4. CAR menu and Car Params
The CAR menu manages the car profiles. Each profile stores its own Car Params: BRAKE, SENSI, ANTIS, CURVE, FADE, PWM_F, BRAKE+, and LIMIT. This is the same parameter group you meet later in the Advanced Config Editor. If DISPLAY -> ADVANCED is OFF, FADE, PWM_F, and BRAKE+ are hidden from the main menu, but the stored profile values still apply.
SELECT: choose active car profile (0-19).RENAME: 4-character name editor (ASCII 32-122). See ASCII table.RACESWP: ON allows profile switching directly from GRID mode.COPY: copy from one profile to another, or to ALL profiles.RESET: reset all car profiles (with confirmation).
5. Driving parameters
This section groups the main setup parameters that shape how the controller feels on track. The deeper explanations are placed under collapsible panels so the section is easier to scan.
BRAKE and BRAKE+
BRAKE
When trigger is fully released, the controller applies normal braking using the BRAKE value.
BRAKE+ in the main menu opens the advanced brake submenu. That is where you now find Alt.Brake and Rel.Brake.
Alternative brake (Alt.Brake)
Alt.Brakemeans alternative brake, an alternate brake percentage (0-100%), not a relative reduction.- It is applied only when trigger = 0 and you hold the brake button.
- If the status bar shows OUTPUT, it displays
Bxxx%while the brake button is held. - Typical use: temporary extra hard or soft corner-entry braking without changing the base setup.
- Some drivers prefer
Alt.Brakelower than normalBRAKEfor a softer temporary button brake, while others prefer it higher for a harder hit. That part is mainly user preference and car feel.

Alt.Brake can temporarily be set softer or harder than normal BRAKE, depending on driver preference.Release brake (Rel.Brake)
Rel.Brakeis the release-brake setting and has three modes:OFF,QUICK, andDRAG.QUICKis the old pre-release brake zone: below the selectedZone, controller cuts drive and appliesLevelas brake force.DRAGonly acts while you are actively releasing the trigger. It keeps throttle active, adds drag during the release movement, and feels softer than QUICK.Zoneis used only byQUICK. In QUICK it is a real zero-output zone near trigger release.- So with
QUICKactive it is normal to see a few%Ton screen while output still remains0%until trigger moves above the selected zone. - Main difference:
QUICKis a hard cut inside the zone, whileDRAGkeeps throttle active and only adds drag while the trigger is moving toward release. - Typical QUICK use: tracks or cars that need a clear early brake hit. Example:
Zone6-10% andLevel70-100% for a strong, repeatable brake as you start to release the last part of trigger travel. - Typical DRAG use: nervous cars that feel too abrupt with QUICK. Example:
Level20-50% to add gentle deceleration while releasing, without the full cut-to-zero feel. QUICK Zonerange: 0-50%.Levelrange: 0-100%.- Use QUICK for a clear early brake hit. Use DRAG for smoother release support without the abrupt feel of full quick brake.

Quick reference for the main menu
| Item | Range | Default | Description |
|---|---|---|---|
BRAKE | 0.0-100.0 % | 95.0 | Brake force when trigger is released. |
SENSI | 0.0-90.0 % (and <= LIMIT) | 20.0 | Minimum motor output at first measurable trigger movement. |
ANTIS | 0-999 ms | 30 | Anti-spin ramp time above the low-output bypass. Higher value = longer/slower power buildup. It is not a pure trigger delay. Display unit and encoder step are configured in DISPLAY -> STEPS -> ANTISPIN (MS / % / TEXT). |
CURVE | 10-90 % | 50 | Throttle mapping. 50 = linear. <50 softer start, >50 sharper start. |
FADE | 0-30 % | 0 | Soft-start zone. 0 = disabled / old behavior. Above 0, the first part of trigger travel ramps from 0 up to SENSI before normal CURVE takes over. |
PWM_F | 1.0-5.0 / 10.0 / 20.0 kHz | 4.0 | Motor PWM frequency. Range follows SETTINGS -> HARDWARE -> PWM MAX (5/10/20 kHz). Higher value often softens low-end response. |
BRAKE+ / Alt.Brake | 0-100 % | 0 | Alternate brake value used while brake button is held and trigger is released. |
BRAKE+ / Rel.Brake | OFF/QUICK(zone+level)/DRAG(level) | OFF | Release-brake helper near trigger release. QUICK uses a zero-output zone; DRAG adds release drag without a zone. |
LIMIT | (SENSI+5)-100 % | 100 | Maximum motor output. <100 enables LIMITER warning. |
STATS | - | - | Lap counter, best lap, and scrollable lap history. Encoder scrolls. Short brake press exits; long brake press resets stats. |
LOCK | - | Unlocked | Toggle settings lock. When locked, all parameter edits are blocked — only LOCK itself remains active. Lock is temporary and resets on reboot. Configure visibility and shortcut duration in SETTINGS → LOCK. Status bar shows LOCK (inverted) when active. |
CAR | 0-19 profiles | CAR0 | Select/manage profile, copy settings, reset car params. |
ANTIS in practice
ANTISis not a full trigger delay. The car should still react when you start pulling the trigger.- At low output, anti-spin is bypassed. So the very first part can still feel direct.
- Once output is high enough,
ANTISlimits how fast power is allowed to rise. - Higher
ANTIS= a longer/slower ramp from the anti-spin start point up toward the requested output. - It only acts on increasing power. Lifting the trigger, coasting, and braking stay immediate.
Typical starting values
These are starting points, not rules. Use them to get close, then fine-tune one parameter at a time.
The right values still depend heavily on the specific car, motor, tires, track grip, and your personal driving style.
| Setup | SENSI | BRAKE | ANTIS | CURVE | FADE | PWM_F |
|---|---|---|---|---|---|---|
| 1/32 balanced | 28-35% | 90-95% | 40-90 ms | 40-50% | 0-6% | 4.0 kHz |
| 1/32 low grip | 22-30% | 90-95% | 100-150 ms | 30-45% | 5-12% | 4.0 kHz |
| 1/24 balanced | 35-45% | 95-100% | 0-30 ms | 50-60% | 0-5% | 4.0 kHz |
| 1/24 high grip | 40-50% | 95-100% | 0-15 ms | 55-70% | 0-3% | 4.0 kHz |
For first tests, leave Rel.Brake on OFF. Add QUICK or DRAG only after the base throttle and brake setup feels right.
From CarSteen/ACD terms to ESPEED32
| Legacy term | ESPEED32 equivalent | Practical effect |
|---|---|---|
| Attack | SENSI | How hard the car launches at first trigger movement. |
| Choke / Choke2 | LIMIT + ANTIS | Top-end limitation and ramp smoothness. |
| Profile | CURVE | Trigger response shape (early vs late aggression). |
| Brake | BRAKE + BRAKE+ | Base brake plus brake-button and release-brake helper settings. |
Legacy setup example (from older guides): for a soft and controlled feel, start around SENSI 40, ANTIS 130 ms, CURVE 30, and adjust from there.
FADE in practice
FADEcreates a soft0 -> SENSIramp in the first part of trigger travel.FADE = 0%disables it and keeps the old direct feel.- Try
5-15%if the car feels too abrupt right when SENSI starts. - Think of
FADEas an extra first point in the graph: it only changes the very bottom end, whileCURVEstill shapes the rest.

Linearity notes
LIMIT: linear cap in commanded output %. Real top speed on track is not perfectly linear.BRAKE: linear brake/drag command in %. Real braking feel depends on motor, tires, and track grip.SENSI: linear minimum output floor in %, but not a linear gain knob across the whole trigger travel becauseCURVEshapes the rest.FADE: linear in trigger-travel %. It only affects the first part of the trigger and then hands control over toCURVE.ANTIS: mainly a time setting in ms, not a pure delay. Once anti-spin is active, a higher value gives a longer/weaker ramp, but the overall feel is not perfectly linear because the low-speed bypass threshold also shifts with the setting.
Curve examples
These figures focus on the response shape itself before looking at PWM frequency and duty limits.


LIMIT in practice
LIMIT 100allows the controller to reach full duty when trigger and curve demand it.LIMIT 70caps the maximum duty to about 70%, even at full trigger.

PWM_F in practice
PWM_Fchanges how often the output switches, not the requested duty by itself.- Under
LIMIT 100, part-throttle can still run at partial duty. UnderLIMIT 70, full trigger tops out near 70% duty. - At the same duty,
1 kHzuses fewer and wider pulses, while5 kHzuses more and narrower pulses in the same time window.
Scenario 1: partial trigger under LIMIT 100
Compare these two images horizontally. Both show the same effective level, 50% duty, so the only difference is pulse density. The dashed line marks the average or effective level.

1 kHz uses fewer and wider pulses, while 5 kHz uses more and narrower pulses in the same time window.Scenario 2: full trigger under LIMIT 70
Compare these two images horizontally as well. Both show full trigger, but LIMIT 70 holds the effective level to 70% duty. Again, the dashed line marks the average or effective level.

PWM_F changes how often pulses occur, not the LIMIT cap itself.6. SETTINGS, POWER, and current draw
SETTINGS groups the global system options that do not belong to a single car profile.
POWER submenu
SCRSV: screensaver line1/line2 text, timeout, and show-now.SLEEP: auto sleep timeout + manual sleep now (wake with encoder button).DEEP SLEEP: auto deep sleep (0 or 2-30 min) + manual.STARTUP: welcome delay 0-990 ms in 10 ms steps.VIN CAL.: measure actual track voltage with a multimeter, set that value on the controller, then click to calibrate the ADC voltage scale. Use only if VIN reading is noticeably off.
SETTINGS root items
HARDWARE: encoder direction, external pot overrides, trigger sensor info/override, and self-test.STATS: show or hide the STATS entry in the main menu. Default OFF.WIFI: background WiFi, direct info page, QR code, and WiFi auto-off timer.LOGGING: local telemetry logging start/stop plus a separate logging auto-off timer (default 30 min).LOCK: configure settings lock — enable the LOCK main menu item (default OFF), set the brake-button shortcut duration (OFF or 1–10 s, default 5 s), and choose whether theLOCKED/UNLOCKEDconfirmation popup is shown.
HARDWARE submenu
ENC INV: invert encoder rotation globally if the menu feels backwards on your hardware.EXT POT: assignPOT 1andPOT 2toOFF,BRAKE, orSENSIlive overrides.TRIGGER: shows trigger sensor family and active type. OnTLE493Dbuilds you can also overrideTYPEbetweenAUTO,W2B6,W2B6_A0, andP3B6.PWM MAX: global maximum forPWM_F. Choose 5, 10, or 20 kHz. Lowering it clamps all car profiles down to that ceiling.TEST: runs the 9-step self-test for OLED, buttons, trigger, and outputs.
Estimated current draw (controller electronics)
| State | Estimate | Notes |
|---|---|---|
| Startup | 120 mA | Short boot and initialization phase. |
| Normal operation | 100 mA | Typical menu/race operation without WiFi. |
| WiFi module active | 150 mA | AP mode and web server active. |
| Screensaver | 80 mA | Display active, low interaction. |
| SLEEP (soft) | 55 mA (estimated) | OLED off, CPU 80 MHz, motor task suspended. |
| DEEP SLEEP | 10 mA (estimated) | Power-off-like state, wake by power cycle. |
Values are estimates and depend on supply voltage, hardware variant, and measurement setup. Motor load for the car is additional. The figures here were measured on the 5 V side after the step-down converter. If you measure on the 12 V side instead, the current reading will be different and is not directly comparable, ref. the voltage/current relationship (U = R * I).
Internal battery (optional)
Some hardware variants may include a small 1-cell lithium battery for off-track setup work. It charges while the controller is powered from the track or from USB. This battery is meant for menu changes, pre-race setup, lane-change adjustments, or avoiding startup delay before the track powers up. It is not intended for long standalone operation.
Runtime below means controller use while not connected to the track. Charging current can vary by charger and board, but if charging is close to 200 mA and controller draw is around 100 mA, off-track runtime will often be roughly double the charge time. Real lithium charge time is still a bit longer than the simple math because the last part of charging slows down near full.
| Battery | Typical charge time | Typical off-track runtime |
|---|---|---|
| 1S Li-ion/LiPo 250 mAh | about 1.4-1.8 hours | about 2.0-2.5 hours |
| 1S Li-ion/LiPo 500 mAh | about 2.8-3.6 hours | about 4.0-5.0 hours |
7. Driving tips
- Change one parameter at a time, then run 5-10 laps before the next change.
- Tune in this order:
SENSI, thenFADE, thenBRAKE,ANTIS,CURVE, and finallyPWM_F. - 1/32 cars on low-grip tracks: try higher
ANTIS(around 100-150 ms) and softerCURVE(<50). - 1/24 cars on high-grip tracks: often lower
ANTIS(0-40 ms) and more directCURVE(50-70). - Use
BRAKE+ -> Alt.Brakeas a temporary cornering tool instead of changing BRAKE between heats. - Use
BRAKE+ -> Rel.Brake QUICKwith low zone (5-12%) and medium level (40-70%) for clearer early braking. TryDRAGaround 20-50% if you want release help without a zero-output zone. - If the car hits too hard exactly when the trigger starts working, keep
SENSIwhere you want it and add a littleFADEfirst. - If the car spins early in trigger travel: lower
SENSIor increaseANTIS. - If the car feels lazy on exit: raise
SENSIslightly or reduceANTIS.
8. Logging, WiFi/USB backup, restore and OTA
Logging
- Open
SETTINGS -> LOGGING. START NOW/STOP NOW: starts or stops local telemetry logging immediately.AUTO OFF: set logging timeout (1-120 min, default 30 min).- Logging itself does not require WiFi. You can keep WiFi off and use USB/WebSerial later, or turn WiFi on separately for live web viewing.
- If WiFi is already active when logging starts, WiFi stays up while logging is running.
WiFi
- Open
SETTINGS -> WIFIto enter the WiFi submenu. START WIFI/STOP WIFI: starts or stops background WiFi immediately.MODE: switches betweenAPandCLIENT.INFO PAGE: opens the WiFi page directly and starts WiFi automatically. Leaving the info page stops WiFi again (unless background mode was started first).- In
APmode the controller hostsESPEED32_XXXXwith passwordespeed32.SHOW QRis available only inAPmode. - In
CLIENTmode you must first enter WiFi SSID and password inAdvanced Config Editor -> Network. Client mode uses DHCP from your router/network and does not show a QR code. - If the Client connection fails, the controller falls back to
APautomatically so you can get back in and fix the settings. AUTO OFF: set timeout for background WiFi (1-120 min, default 10 min).- Open the IP shown on the OLED in your browser. In
APmode this is typically192.168.4.1. InCLIENTmode it is the DHCP address assigned by your router. - The first page is public controller home. Sensitive tools such as
Controller Panel,Backup,Restore, telemetry, OTA, andAdvanced Config Editorare protected by controller login. - Default controller login is username
espeed32and passwordespeed32. The current login is also shown on the controller WiFi info page. - Backup files do not export Client WiFi or controller login passwords. Restore keeps the local WiFi/login credentials already stored on that controller.

WiFi increases controller electronics current draw from roughly 100 mA to 150 mA, about 50% more. On units with an internal battery, use WiFi sparingly and switch it off when you are done.
Status bar behavior while WiFi is active: WIFI uses the first blank slot; if no blank slot exists, slot 4 is shown as WIFI until WiFi stops.
Advanced Config Editor
- The browser portal also includes an
Advanced Config Editorfor live setup changes. Global Configedits controller-wide settings.Car Paramsedits the selected car profile.- Under
Global Configyou can also set Client WiFi SSID/password and the controller login password. - In
Car Paramsyou can load and edit any car profile directly from the dropdown, even if another profile is currently active on the controller. Refresh from devicereloads the current values from the controller.Apply (RAM only)lets you test changes live without writing flash first. This is ideal for trying brake, throttle, anti-spin, curve, fade, and release-brake changes on track.Apply + Save to flashstores the same values permanently after you are happy with the live test.- On the controller WiFi page the editor works directly in the browser over WiFi. On hosted
espeed32.com, the same editor requires a USB WebSerial connection.
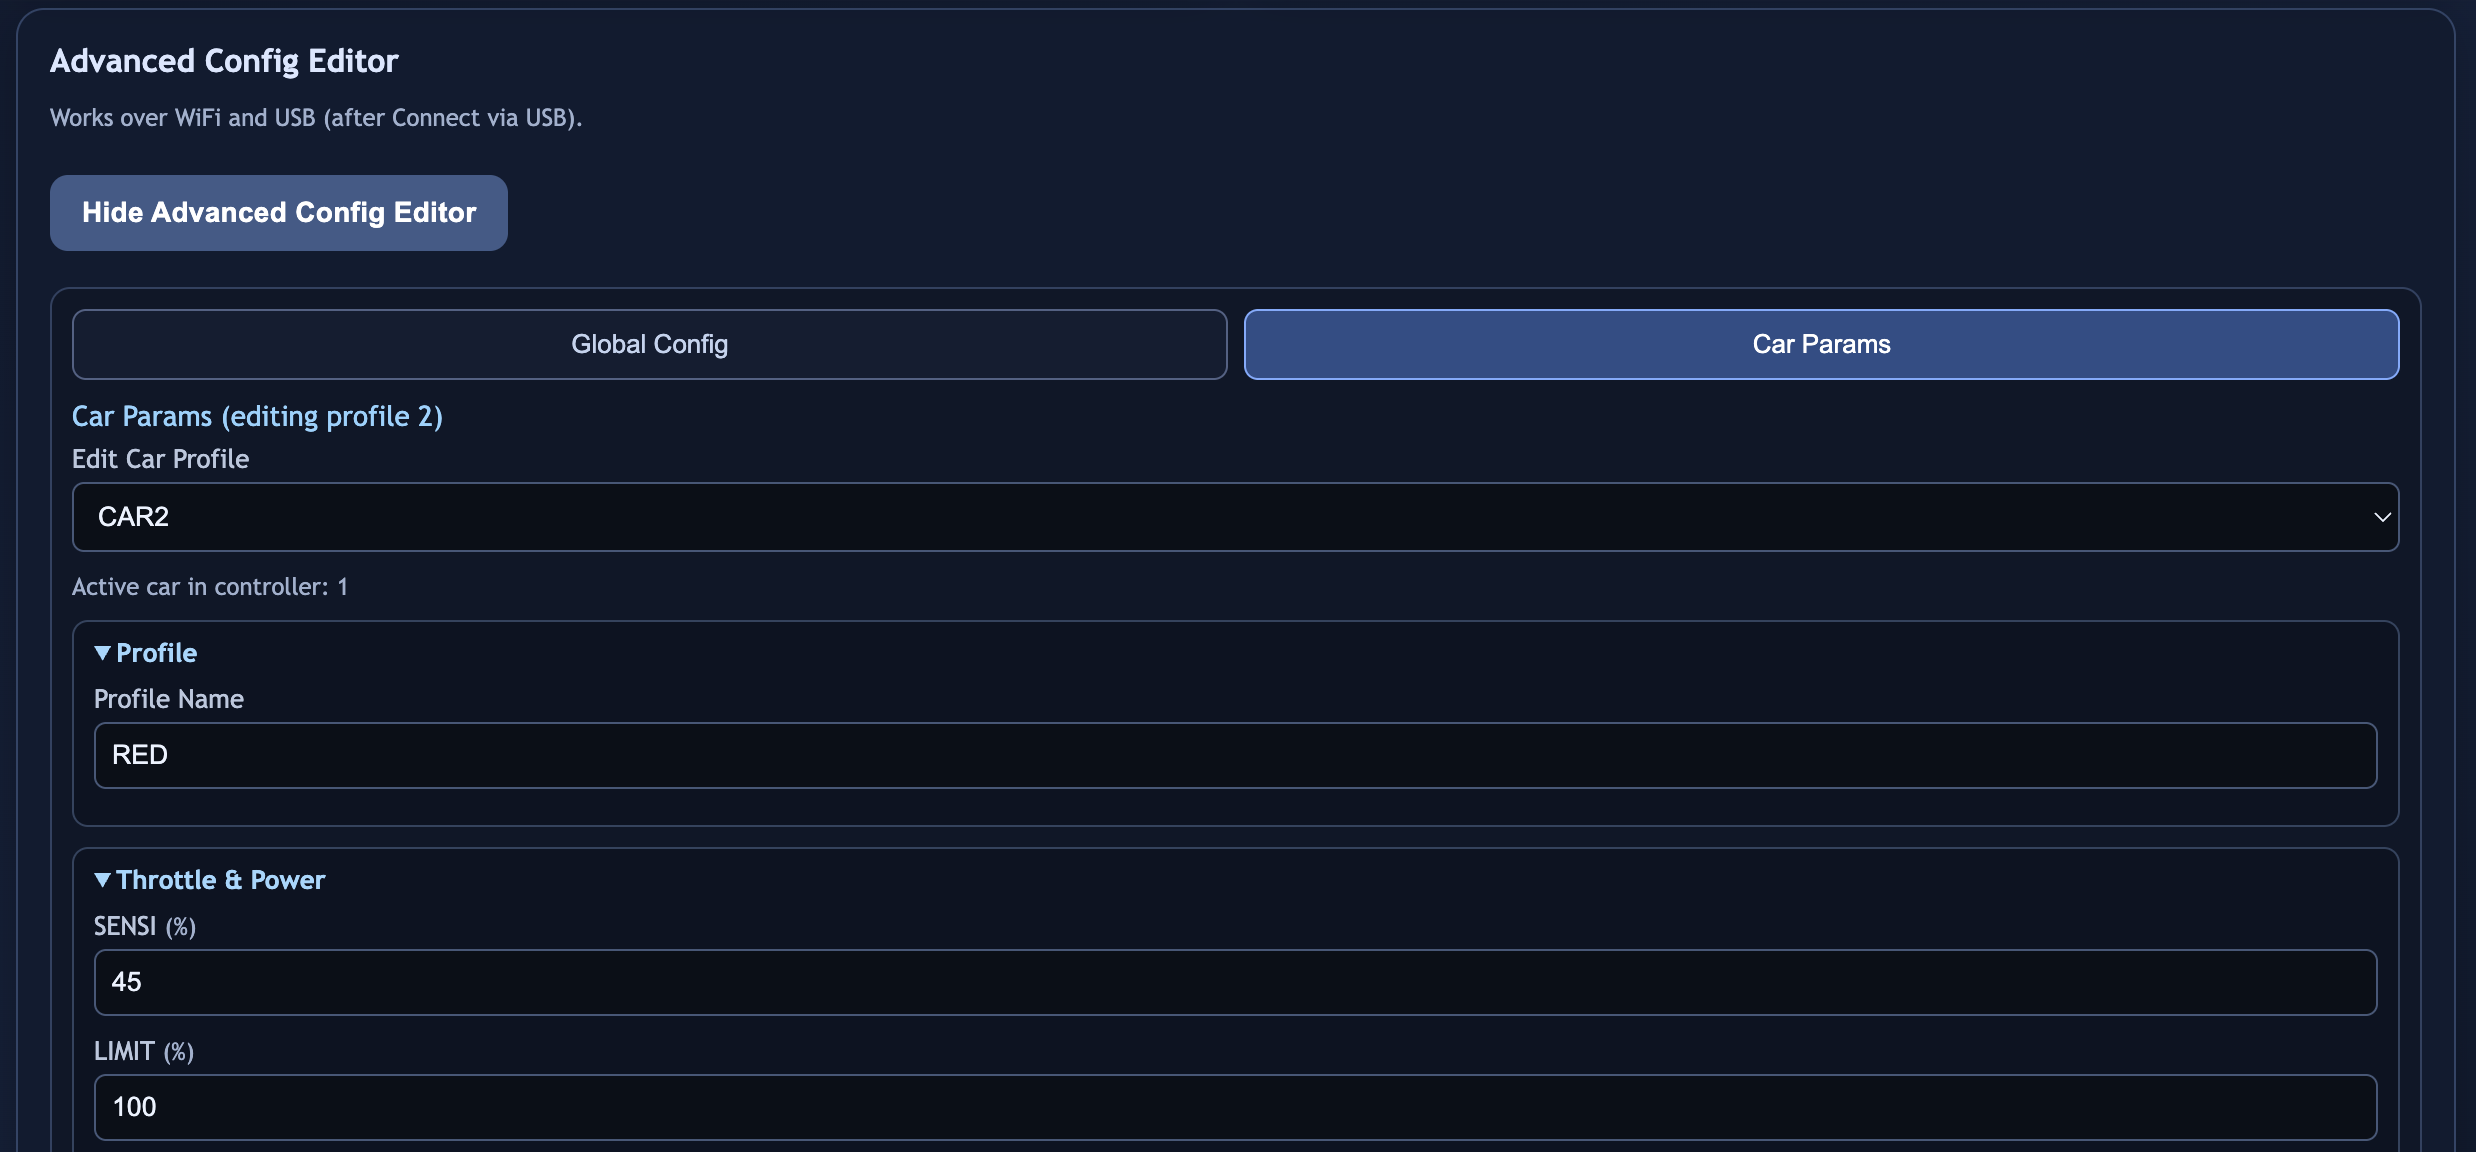
Car Params tab with profile selection and live-editable car settings. The editor UI is shown in English here, but the workflow is the same across all manuals.USB
- Open
SETTINGS -> USB INFO. - Use Chrome/Edge (WebSerial).
- Backup/restore works over USB; OTA requires WiFi mode.
- Automatic paired OTA installs the standard official release pair, which uses the default
TLE493Dfirmware build. - If your controller uses another trigger sensor family, upload the matching sensor-specific firmware file manually together with the SPIFFS file from the same release.
- On Windows,
flash_all.shusually means Git Bash or WSL. Arduino IDE can still upload the sketch, but trigger sensor family remains a compile-time selection.
Never remove power during OTA upload.
9. Menu tree (complete UI map)
ROOT (Main Menu)
|- BRAKE
|- SENSI
|- ANTIS
|- CURVE (graph view)
|- FADE (graph view, ADVANCED=ON)
|- PWM_F (ADVANCED=ON)
|- BRAKE+ (ADVANCED=ON)
|  |- Alt.Brake (%)
|  |- Rel.Brake (OFF/QUICK/DRAG)
|  |- Zone (%) [QUICK only]
|  |- Quick (%) [QUICK mode]
|  |- Drag (%) [DRAG mode]
|  `- Back
|- LIMIT
|- SETTINGS
|  |- POWER
|  |  |- SCRSV
|  |  |  |- NOW
|  |  |  |- LINE1
|  |  |  |- LINE2
|  |  |  |- TIME (0-240 s, 0=OFF)
|  |  |  `- BACK
|  |  |- SLEEP
|  |  |  |- SLEEP NOW
|  |  |  |- INTERVAL (0-10 min, 0=OFF)
|  |  |  `- BACK
|  |  |- DEEP SLEEP
|  |  |  |- SLEEP NOW (power-off)
|  |  |  |- INTERVAL (0 or 2-30 min)
|  |  |  `- BACK
|  |  |- STARTUP (0-99 x 10ms)
|  |  |- VIN CAL.
|  |  `- BACK
|  |- DISPLAY
|  |  |- RACE MODE (OFF/FULL/SIMPLE)
|  |  |- LANGUAGE (NOR/ENG/CS/ACD/ESP/DEU/ITA/NLD/POR)
|  |  |- CASE (UPPER/Pascal)
|  |  |- FONT SIZE (LARGE/small)
|  |  |- ADVANCED (OFF/ON)
|  |  |- STEPS
|  |  |  |- ANTISPIN
|  |  |  |  |- REG.TYPE (MS / % / TEXT, default MS)
|  |  |  |  |- STEP MS (1-50 ms, default 5)  [hidden in TEXT mode]
|  |  |  |  |- STEP % (1-100 %, default 1)   [shown only in % mode]
|  |  |  |  `- BACK
|  |  |  |- BRAKE STEP (0.1-50.0 %, default 1.0%)
|  |  |  |- SENSI STEP (0.1-5.0 % in 0.1% increments, default 1.0%)
|  |  |  `- BACK
|  |  |- STATUS BAR
|  |  |  |- SLOT 1
|  |  |  |- SLOT 2
|  |  |  |- SLOT 3
|  |  |  |- SLOT 4
|  |  |  `- BACK
|  |  `- BACK
|  |- SOUND
|  |  |- BOOT (ON/OFF)
|  |  |- RACE (ON/OFF)
|  |  `- BACK
|  |- HARDWARE
|  |  |- ENC INV (ON/OFF)
|  |  |- EXT POT
|  |  |  |- POT 1 (OFF/BRAKE/SENSI)
|  |  |  |- POT 2 (OFF/BRAKE/SENSI)
|  |  |  `- BACK
|  |  |- TRIGGER
|  |  |  |- FAMILY
|  |  |  |- ACTIVE
|  |  |  |- TYPE (AUTO/W2B6/W2B6_A0/P3B6) [TLE493D only]
|  |  |  `- BACK
|  |  |- PWM MAX (5/10/20 kHz)
|  |  |- TEST (Self-Test, 9 steps)
|  |  `- BACK
|  |- STATS (ON/OFF, default OFF)
|  |- WIFI
|  |  |- START/STOP WIFI
|  |  |- MODE
|  |  |- INFO PAGE
|  |  |- SHOW QR [AP only]
|  |  |- AUTO OFF (1-120 min, default 10)
|  |  `- BACK
|  |- LOGGING
|  |  |- START/STOP NOW
|  |  |- AUTO OFF (1-120 min, default 30)
|  |  `- BACK
|  |- LOCK
|  |  |- MENU ITEM (ON/OFF, default OFF)
|  |  |- SHORTCUT (OFF / 1-10 s, default 5 s)
|  |  |- CONFIRM (ON/OFF, default OFF)
|  |  `- BACK
|  |- USB INFO
|  |- RESET
|  |  |- CAR
|  |  |- SETTINGS
|  |  |- CALIBRATION
|  |  |- EVERYTHING
|  |  `- BACK
|  |- ABOUT
|  `- BACK
|- STATS [if enabled]
|- LOCK [if enabled]
`- CAR
   |- SELECT
   |- RENAME
   |- RACESWP (grid car select ON/OFF)
   |- COPY
   |- RESET
   `- BACK